Lesson Plan
Cartoon Enlargement by ECSDM
Assessment
- Completed project handed in to the teacher.
- Completed student evaluation form.
SMART Board
This instructional content was intended for use with a SMART Board
Description
- Using the grid system drawing technique, students will enlarge a cartoon comic strip.
Materials and Resources
Cartooon Enlargement.notebook
Objectives
Students will be able to…
- Enlarge a cartoon using the grid system drawing technique.
- Learn how to increase the size of something, while keeping the same proportions as the original.
- Use markering techniques similar to those of a graphic artist.
Vocabulary
Enlargement- To make larger.
Grid- Arrangement of crossed lines.
Cartoon- Drawing that is a caricature
Comic Strip- Cartoon series as in a newspaper.
Duration
- Six , 45-minute class periods.
Materials/Resources
Art Supplies:
- Pencil
- Eraser
- Rulers
- Oak Tag Scraps
- 18 X 24 White Drawing Paper
- Markers
- Sunday Comics
Procedure
- The class will be shown pictures by several Pop Artists.
- Students will select a cartoon from the Sunday Comics section.
- Students will fold cartoon and large drawing paper into a grid of 16 squares.
- Students will sketch out their cartoon in pencil.
- Students will marker in their cartoon drawing.
- Students will outline all lines in black marker.
Day 1
- Begin class viewing artwork by several Pop Artists. Analyze and discuss their artwork and how it is related to the class project.
- Have students read the Sunday comics and select a strip for the class to work on.
- Students will then vote on the strips the class will complete.(you will need between 3 to 4 strips depending on the class size.
- Have students separate the strips using scissors and place into a hat.
- Students will then pick a cartoon to enlarge.
- Students will then tape their cartoon onto a piece of oak tag and put their name on the back (so cartoon does not get lost!).
- Following a teacher demonstration... utilizing the cartoon enlargement SMART Board notebook.
- Students will begin to grid out their cartoon and their paper by folding them in half each direction 3 times.(creating 16 boxes)
- Students should then draw a pencil lines over their folds.
- Students will then begin to enlarge their cartoon onto the paper keeping the same proportions as the original cartoon.
Cartoon Enlargement Notebook
Day 2
- Review procedures from the previous class.
- Students will continue drawing their cartoon.
- When students are finished, they should erase their grid lines on the paper.
Day 3
- Review procedures form previous lesson.
- Students will be discussing marking and how a Graphic Designer would marker their own artwork.
- Following a teacher demonstration step by step students will complete a marker test.
- Students will begin marking their cartoon enlargement with warm colors first.
Day 4
- Review previous class procedures and how to marker like a Graphic Designer. Students will continue markering their cartoon enlargement with warm colors first then cool colors.
- MARKER TEST.doc
Day 5
- Review previous class procedures and how to marker like a Graphic Designer.
- Students will continue markering warm colors and then cool colors.
- Black will be added last to the cartoon enlargement seeing how every detail will need to be outlined.
Day 6
- Students will finish outlining their cartoon in black marker and complete a student evaluation form
Author
Janet W. Andrews-Coyle, Enlarged City School District of Middletown
Student Artwork
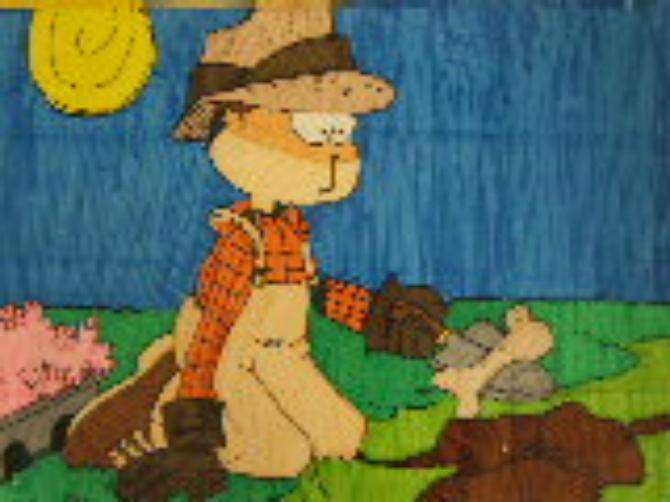
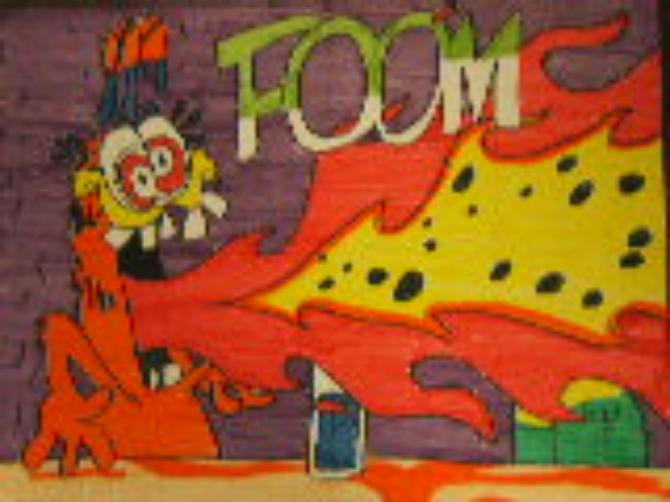
- Examples of student artwork.